Showing posts with label DIY. Show all posts

Friday, April 15, 2016

GETTING KIDS IN THE KITCHEN: Easy Cheesy Bread Rolls

Hello, everyone! How was your dinner last night? Ours was delicious. We had chicken soup with cheesy bread rolls, which was made with the kids! 

When I told my daughter we were going to bake together, she got so excited. Big smile across her face, jumping and down, shouting, "YEAH YEAH YEAH!" She loves to help. It makes her feel like a big girl. My son didn't really care until we actually started making them. Then, he wanted in on everything. 

We used an extremely basic recipe. These guys are both under four, and there are two of them, so things get real messy and hectic, real quick. I asked my husband to take photos of our endeavor- I love the man, but he seemed to enjoy taking candid photos of my face more than his designated task.


At least he had fun, right?

For this recipe, we just used a premade raw dough from Basha's. You can honestly use any recipe. I am not going to go all out and say, "Here is my very own made-from-scratch sprinkled with love bread rolls recipe," because it is not that. It's sprinkled with love, but that's all. The point was to get two toddlers excited about cooking, and this certainly helped with that. I have plenty of original recipes, I promise! Those just tend to be desserts. Maybe I'll share them someday. Maybe. If you're good ;)

Anyway, you can also just use crescent roll dough, pizza crush dough, whatever. Our whole house actually really likes Basha's crust dough. It has a great flavor and always bakes nicely chewy and fluffy. My dad uses it for stromboli, and it's amazing. We then just used butter, shredded cheese, garlic powder, rosemary, black pepper, and paprika. No real measuring involved this time. We had to be quick, and we wanted the kids to have fun so they want to get involved more.
First thing we did was melt some butter and spread it around on the pan. I totally misjudged the size of the pan, but it got the job done, and it did provide more room for the kids to work without getting flour all over the table. The large size basically worked as a tray, so that worked in our favor.


After that, the kids had fun playing with the dough and rolling it into balls (and yes, they washed their hands first). It was pretty sticky, so we added flour to their hands as well as the bottom of the pan.


This part got messy, but they enjoyed it. It is a good sensory experience for little ones, with the powdery flour, the sticky dough, and the slippery butter, if your kids rub their hands in it like mine did. Rolling the dough into balls does help work with their coordination. They really do not have to be perfect, either. This is something for them to make without much room for failure. A successful recipe will encourage them to do more.


 Aferward, my daughter poured on melted butter and my son spread it around with the basting brush. Teamwork, right?


He also helped eat the cheese after Luna helped dump it on.

Both of them added seasonings (my son likes to help add seasonings onto things. He'll even dump salt and pepper onto my food when he thinks I need it).

As you can see, they really enjoyed themselves. 

I wasn't able to get a photo of the baked result. They were pretty much eaten as soon as they came out of the oven. My brothers all loved the rolls, and hearing their praises really gave them a confidence boost. Here's an image of them before they were baked, though.


Not bad for a couple of toddlers, right?

They came out very fluffed up with a great texture. They were gone pretty darn quickly. The important thing, however, is that the kids got involved. When you're working with little bitty ones, a full on from scratch recipe can be overwhelming, especially if the kids have any sort of spectrum issues. It can be time consuming, and they can get bored easily. This was short enough for them to enjoy the whole process, which leaves them wanting more. A very basic and simple recipe leaves little room for error, which means they won't be discouraged. Over time, they will learn trial and error, but right now, the goal is to get them to enjoy working in the kitchen. They had fun, they contributed, they enjoyed the end results, and they loved the encouragement from their uncles and grandparents. 

What recipes did you first make as a kid? What recipes do you make with your kids now?

Thursday, April 7, 2016

HOMESCHOOL PROJECT: Tea Blending Online

Good day, everyone! Today is actually a very windy and cloudy day, here in Tucson. A perfect day for tea! If you are not a tea drinker, hold tight... you may be one after this post. 

By no means am I a tea connoisseur, or expert, or anything. I am a casual drinker. I do believe in the benefits, certainly. I've always liked the taste, but only really actively got into loose leaf instead of tea bags about a year or so ago. Honestly, I would not have gotten into loose leaf if it hadn't been for a really neat brand I found, Adagio. 

Adagio is mainly a website. I believe they do have a store location, or two, but they are not a chain like Teavana. I don't think they even sell blends in other stores. Instead, you will probably have to order online... but, that is where the fun is. Adagio has a really cool feature that allows you to create your own custom blends, and they give you a pretty big variety of options to mix together. You can also buy the blends others have created. I have used this option over and over again, and other tea fans have actually quite liked my creations! If I, someone who doesn't know jack about tea blending can make yummies, anyone can, including you and your kids! I will post some screen shots of the creation process to guide you through, and of course, end with a summary of how this can be made into a great educational experience, along with some extra project ideas.

If you want to save your tea blends, you will have to create an adagio.com account, but they have you do that after you create a tea blend, so don't worry about that just yet. I already have an account, but I will create a new one to show the first steps. The reason for this is because the more blends you make, the more options you get, and I will demonstrate that as we go along.

Step 1: 
First, simply go to adagio.com. On the top-ish of the screen, click "blends," then "create a blend."

Step 2:
If you scroll down just a tad, there is a basic tutorial video, and you can watch that if you want, but it really is not that informative. Scroll down and you will see the first options, which is where you mix up to three different premade tea blends and flavors. Your options are a wide variety of teas, including different flavors or pu erh, green, white, oolong, Earl Grey, herbals, and more. They are all natural, even the flavored ones. There are even decaff options.

 
 When you select which teas to blend, you also have to choose the percentage of each blend. For instance, 30% white peach, 40% white chai, and 30% wild strawberry. The percentages are all in tens, and, obviously, you cannot make it add up to above or below 100%. Each flavor gives you a description of the taste and ingredients when you click it.


Now, here is something I noticed. When you are brand spanking new to the site, you do not have the option to add in inclusions, which are just extra little scoops of things like different flowers, fruits, and even candies. After you create a blend, you get the option to add in inclusions. Over time, as you create more blends, you are able to add in two, and eventually three. I am up to three inclusions per blend now. Now, of course, it may sound disappointing that you cannot immediately add these in, but not all is lost. We will get to that in a bit here. Lets go to step 3 for now.

Step 3:
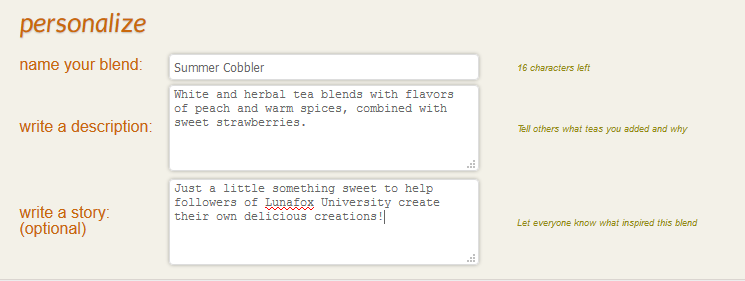
Now that you have your blend chosen, you may now name and describe your tea. You can also give a little background on the inspiration for your special-TEA. Special-teeeaaa. See what I did?
Sorry.

Anyway, here is what that section looks like.

 Pretty neat, right? It's getting personal now.

Step 4:
The final step to creating the blend is the artwork. Adagio does ask that you do not use images created by other artists, as that is a risk of copyright infringement. However, you are free to upload your own photos and designs. You can also use one of the premade designs. Remember that custom designs have to be rectangular, or the designs will be squished to fit the format.


Step 5:
Now is wen you can create an account. You can set this particular tea blend to be private or public. The benefits to public blends are that others can purchase them. You do not get money for this, but you do get frequent user "cups," which can be used for credit to get more tea. 100 points is $10 in free tea! Points are earned by purchasing, reviewing, and "selling."You can also add tags that describe your tea to help others find them in their searches. When you are finished, clock "create blend."


Step 6:
Congrats!! You created your first tea blend! Doesn't it look pretty?

As you can see, you can like your blend on Facebook, pin it on Pinterest, or even Tweet it. Nothing wrong with sharing your creations!

Now, as for the prices, they may look hefty. To be honest, the sample prices are, but the pouches are actually a really good value. You get a lot more than it seems, and Adagio is cheaper than most loose leaf tea blends out there without sacrificing taste or quality. A full pouch, drinking once a day, can easily last you a couple months. Mine last me about a month if I drink every single day, but I also brew mine extra strong. 

Well, now that you basically know how to make your own blends, lets discuss how this can be used to educate your kids, shall we?

How can Adagio be used to teach kids?

1) Ratios and math. Young kids can benefit from using the percentage feature, as it helps them learn how to add tens to equal one whole, or 100%.
2) Advertising and marketing. What key words would you use to attract people to your blend? What sort of image portrays the flavors, colors, or ingredients used? Do you have a photo that works with the tea? Can you create an image? What age range do you think would like your tea blend the most? Does using other means of social media help attract customers?
3) Experimentation. How did your tea taste, if you ordered it? Is there anything you would change next time? How did it smell?
4) Health benefits. Teas have a huge range of health benefits, and different types all have different things that can aid your health. Some are full of antioxidants, and they all have different levels of caffeine. Look up the differences between loose leaf and tea bag. Fruits and herbs vary in health benefits as well. Even honey used to sweeten tea has healing properties. Research them together.
5) Gardening. How is tea grown? What is the difference between white, black, and green tea? What about oolong and rooibos? What sort of plants are used? Can you grow herbs for teas at home? What kind of bugs pollinate the plants used to teas?
6) Geography. Where does tea come from? What herbs and fruits grow best in different countries and climates?
7) History and social studies. Adagio even gives brief lessons on the origins, and even the growers, of their ingredients. History has a very huge history, and has been used for many things all around the world. Read up on how teas are used in different areas of the world.

What projects and lessons can be used in coordination with Adagio?

1) Grow your own tea ingredients. This is where that part about lacking the inclusions option comes in. If there is something you want to add to your tea, such as bits of fruit, spices, flowers, or even sprinkles and candy pieces (chocolate bits and candy cane can actually be quite yummy in tea!), learn how to grow them together, and start your own tea garden. If you don't want to wait a few years for a tree (in case you are thinking something like orange zest), then learn how to purchase the ingredient needed and properly dehydrate it for tea usage. That is a homestead and cooking skill that can be used for their whole lives!
2) Make it a sweet, artsy gift. Kids of all ages can have fun designing baggies, cards, or even making treats to go with their tea blends, and give them to friends and family. You can even use a tad bit of the tea blend in things like soaps, bath bombs, and lotion bars. 
3) Cook with tea. Yes, you can cook with tea! I have made my own recipes for green tea cake and black tea cake (which actually became a surprising family favorite). The trick is to boil about four tablespoons in the milk you use for your recipe, and leave the tea in the milk to bake in the cake. Experiment with different flavors of glaze, or add in extra coordinating fruits, spices, and nuts. You will have a truly unique dessert or breakfast cake.
4) Encourage your child to practice their marketing and advertisement skills. For young kids, allow them to design the label for the tea, and also an "poster." They can use paint, card stock, paper, stickers, whatever is on hand to design a poster used to grab a customer's attention. Have them draw pictures and use colors to represent the ingredients, or the actual product, and learn to use key words. Maybe, even have them act out a commercial. For older kids, they can design from scratch, or even use real photos they took (if they are into photography) and photo editing software such as PhotoShop, PhotoFiltre, and Gimp. Allow them to research the age range and gender that will be more likely to appreciate their tea blend. Teach them to use social media to spread the word on their new blend. Adagio also has a feature for leaving video reviews. If your child is curious about video reviews and commercials, allow them to work with that feature and create a well-made review. Advertising and marketing is a highly sought-after skill in any business, as it is what attracts customers. Pay attention to font style, colors, images, and descriptions. You can even suggest they research the cost of ingredients and discover how much ingredients from the source would cost so they may create an imaginary price for the blend.
5) Research the history of the ingredients. Where was white tea first used? Why is green tea so commonly used in Asian culture? How did Earl Grey tea get its name? Tea is full of rich histories. Research which cultures use and grow the types they used in their blends, how different cultures drink their teas, and how tea is used in everyday life and celebrations. You can also turn it into an English lesson and have them write a research paper on it.
6) Create specific teas meant to do specific tasks. For instance, if you are looking for a tea that is meant to calm the body before bed, research which teas have low caffeine and which herbs have calming effects. For teas that heal colds, look for ingredients that have high antioxidants and vitamin C. Teas can be used for nausea, headaches, illness, relaxation, and rejuvenation, depending on what is used. Remember that this includes tea leaves, fruits, herbs, and spices. If there is a pregnant woman in the family (or a friend), consider looking into what teas and herbs are safe to use on pregnant women, and what the benefits are. Be careful, though, as many doctors and midwives warn about using certain herbs. For instance, raspberry leaf is great for the third trimester, but heavily not recommended before that. Chamomile is also considered not safe during pregnancy. Young adults and teens can benefit from learning which herbs are safe and which aren't, for whenever they decide to start a family.
7) Research local tea growers. What local brands are there? What sort of unique ingredients are native to your home? What ingredients grow best in your climate? How much do they make in profit? Perhaps set up an interview with a local tea grower, and sample some of their product!


As you can see, something so simple can really be highly beneficial. I have been using the site for at least a year, and it only just hit me today that this can be a very educational tool for any age. Obviously, purchasing tea all the time can add up, especially is you are using loose leaf, so you may want to only do this every now and then. An alternate option is to buy some mixed sample boxes of tea bags from any grocery store, cut the bags open, and blend together, but honestly, you will not have the same quality. Tea bags also have to be heavily sweetened to even be palatable (to me, anyway) while loose leaf usually doesn't, since it contains whole fruits and higher quality ingredients. That's just my two cents, though.

So, relax, and have fun <3
What sort of teas do you like?
 

Sunday, March 27, 2016

DIY PROJECT: Melt and Pour Goat Milk Soap

Hello, everyone! Turns out, today is Easter. My family does not really celebrate most holidays, so we didn't do any egg dipping, hunting, or anything bunny-related. We did, however, make some simple springy soaps today. 

Now, there is nothing super duper fancy or different about these soaps than what you may have done before. These are just simple melt and pour soaps. However, these are an excellent craft for kids of any age three and up to do! But, if doing this with little bitty ones, be sure they are able to understand to not touch any of the containers that hold the melted soap, because they are hot. I did this today with my two kids, ages 2 1/2 and almost 4. My 4-year-old daughter did a great job following directions and being sure not to touch anything I told her was hot. She knows hot = ouchie. My son, well... he was impatient. He loves to stir things and play with colors, so he was overly eager about using my food coloring. He also loves to mix things. It makes him feel like a big boy, so being told, "We need to stop mixing," just devastates him. It's awful to hear, I know. But, those are my kids. Every child is different. You have to make the call on if your kids can handle the project.

To make the soaps, we started with the absolute basics: Pour and melt soap base, peppermint essential oil, silicone molds, and food coloring. You can add extra things (I actually did mix in some cocoa powder into one of them), but for your first time, especially if you have really little ones or multiple kids, you might just want to start off simple.

This is the soap base I used, Goats milk Glycerin Soap Base- 2 Pound by Soap Expressions. 2 pounds for about $10, shipped with Prime. I used three out of eight rows (going horizontally) and we got five bars of soap. In total, depending on your mold size, this should make about 8-12 bars. That can change, too, depending on what sort of things you add in that can take more space, like coffee beans, flowers, or even plastic toys. 

Just cut them up into cubes in a microwave-safe bowl. It took about two minutes for them to get thoroughly melted, melted at one minute at a time. They do harden back up fairly quickly, but you can remelt them with no issue. 

Now, do take note, this stuff does have a funny smell. In my experience, though, pretty much all melt and pour soaps smell funny. Be sure to have some sort of essential oil to make these smell the way you want. We used NOW Foods Peppermint Oil (Liquid), 4 oz for these ones. It takes a few drops per bar, I'd say, but just add it in one or two drops at a time until is smells how you want it to smell. 

You can also add food coloring to this. I used a single drop of concentrated Ameri-Color food gels, found on Amazon. That blue swirl was later added by my daughter. You can use any food coloring. Don't use too much, or the lather will be too colorful and can tint your hands. 
My daughter decided to go with purple, and she chose a flower mold. You can make them solid colors, or you can make multiple small containers of different colors and swirl them, or layer them in the mold. Be sure to add your oils into the soaps BEFORE you swirl or layer, and before you put them in the mold. After that, you just wait and let them cool down. That's it. If you layer them, you will have to let each color cool down in the mold before adding the next layer on top, or they will mix together.

Now, I got my molds in various places. I actually have a pretty huge silicone mold collection. I love them. They are so versatile, easy to use, and come in almost any shape you can think of. The ones I used today were a sunflower one that my mother had bought for me from a garage sale, and a woodsy one from World Market. It's normally $6, but I purchased it for $3 during a sale. You can find these all over- Walmart, Amazon, Target, eBay, AliExpress... usually, they are very cheap. They can cost about $10 each on Amazon with Prime. I typically buy from China sellers on eBay, which brings them at only about $3 per mold, give or take. That does take longer to arrive, though.

Now, I know... It is a very simple task. Not much rocket science behind it. So, how does it benefit your child? Lets count the ways.
1) It allows experimentation with color. They get to see first hand how colors mix into new ones. 
2) It's a marketable skill. If they enjoy this, encourage it! Quality soaps can be sold online. As they grow older, they can learn more and more about which oils and add ins to use and what they do. Eventually, they can even learn how to make high-quality soaps from scratch. It's a product that can grow with them, so they can make money in the future as a side job or main source of income, if they choose.
3) It's a science lesson. Which soap base makes your skin feel softer- the plain glycerine, the goat milk base, or the honey base? What happens if you mix them? What do the different oils do for your skin? Why does the goat milk soften skin? What oils smell good when mixed together? These are all things you can research together, and experiment with. When they grow older (I would suggest at least age 12 because doing this from scratch can be dangerous, if you are not careful), you can all learn how to make these from different oils and lye. These will give you higher-quality soaps, but you do have to be extremely careful. Lye is in every soap out there except glycerine bases like this, but in its pure form, it can badly burn your skin. However, thousands of people do it all over the world just fine. You just need to take the proper precautions.
4) It's a great sensory and stimulation project. On top of the colors alone being fun to use (and of course, if you do not feel comfortable with food dyes, you can use natural ingredients and food colorings like beet powder), you can also add things nice to the touch. Coffee beans and oats are great for the skin as well as give texture to the soap. Just make sure they are small enough to go down the drain. Salt gives an exfoliating texture. Flower petals add a touch of natural color and are delicate on the skin.
5) You can make it a lesson in natural medicine. Have your kids smell the different oils and discuss how they make them feel. Which ones make them feel relaxed? Which ones make them feel rejuvenated? Which ones are healthiest for the skin? Let them pick out a scent, and research together and experiment with what else the oils can be used for. For instance, peppermint is also great for curing headaches and easing nausea, when sniffed. You can even use herbs and flower petals, as long as they are safe for the skin.
6) Show them how to make a home business with it. If this is something they enjoy, and keep asking over and over to do, show them how to sell some to earn money to buy more supplies. After all, the costs can get hefty. Research together what colors go with what smells- orange with orange, green with mint, yellow with lemon, etc. Also take time to associate shapes, colors, and ingredients with the seasons. Molds that make sunflower shapes would be great for spring or summer, and you can make them in citrus scents to match their yellow color. Learn about what soaps will appeal most to men, women, boys, and girls. Teach them to add and subtract supplies, profits, and if applicable, selling fees. It generally costs about a dollar per bar, on estimate, so figure out a profit margin you would like to help them make, and advertise away to friends and family, even neighbors. If you wish, you can even teach them about paying "employees." 
7) It encourages hygiene. Kids love using what they make themselves. They're going to love using their own soaps in the tub! Pair this with a lesson on germs and avoiding getting sick.
8) They make adorable gifts. You can make ones with more woodsy scents for Dad and Grandpa, pretty floral ones for Grandma, or fruity ones for friends- whatever they would like best! It's a gift that is completely custom made for them by the little loved ones in their life, and they can actually use them. They take thought, time, and love to make, which makes them even more special. I already have one grandma asking for some!
9) It's a great family bonding project. You all get to make something usable and enjoyable. They're pretty, functional, smell good... and hard to mess up. You may have a bit of dishes left over, but at least they are dirtied with soaps! 
10) It's great for all ages, boy and girl. Really, kids of all ages and genders can have fun with this. Just because it's a "spa item" doesn't mean it has to be all about pink, glitter and flowers, unless that's what your boys like. There are plenty of more "masculine" scents out there to use. Heck, if they are skeptical teen boys, encourage them to use scents that girls like on men, if that's what it takes. And come on... what girl would not swoon if a guy took time to make them pretty soaps? Buy an alphabet mold and help him make hand sized soaps that make a sweet message. Use your imagination!
10) It teaches patience. You do have to wait for them to cool down, after all! Good things come to those who wait- a lesson we all have to learn.
11) It's a confidence booster. Kids will be so proud of these! My son has been carrying his soaps for two hours now... sheesh.

Honestly, you can't really go wrong with this project. It's a lot more educational than people realize. 


Seriously, look how cute these are. Not bad for a couple kids under four.

Another neat thing, very little of the product goes to waste. It just peels right off the spatulas and bowls.
No joke, it just peeled right off. That made clean up so much easier. I just rolled it up into a ball, heated it for ten seconds, and smooshed it into a mold.

So, overall, this is a great thing to do with kids. You can even make a gift out of it and buy your kids extras like glitter, toys, and more to add in and have a big soap making day. Have fun!

In case you are wondering, here are links to what I used.